Try to Contain Your Excitement!
I’m sure I’m not the only one who wishes I had access to my own nursery and greenhouse at all times: perfect temperatures, seed trays, and multi-sized pots galore! Alas, I’m also sure I’m not alone in the fact that I do not have access to these tools, but that’s okay! Any enterprising individual can create places to plant with a number of different items you probably already have on hand!
You can really use almost anything to plant in as long as it is deep enough to support developing root structure. I’m sure we have all seen photos of people with plants in everything from old shoes to toilet bowls! We won’t be suggesting anything so extreme but we are hoping that you can utilize some of these tips in prepping your victory garden this year!
Starting from seed requires a small amount of soil and a place to hold the seeds and soil. To create something comparative to a seedling flat you can use a number of household waste items! Truly bringing back the mindset of the past century of being creative and reusing items on hand as much as possible, while also reducing waste!
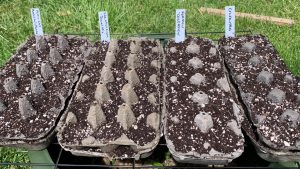
Egg cartons are ideal for creating individual seedling planters as they create a pocket of soil just deep enough for a seedling to get its feet steady. Using old takeout boxes is another way to imitate a seed flat. Any seeds planted with this small depth will need to be transplanted into a larger container once they have established their roots.
You will need to transplant the seedlings into deeper containers when they have developed their second set of leaves to allow their roots to continue to develop and strengthen before direct planting into the soil. Let’s get creative again! Now we are trying to mimic 4” pots that most transplants come in. Some ideas here are old salsa containers or tin cans with drainage holes in the bottom. You just want to make sure here that you will be able to effectively remove the seedling once it is time to transplant into the ground.
Now comes a tricky issue, where will I store my seedlings until it is time to harden them off and then transplant into my garden? I’m sure many of you like me, also have animals that love to sniff, dig and otherwise wreak havoc on your plant babies, so here is another tip for how to keep these little babies happy until they are free from indoor attacks.
If you can, find an elevated place away from curious eyes, paws, and noses. For me, this was a small ledge in my kitchen above the sink, for you it might be a top-shelf, maybe even inside a closet? The problem with this method can be a lack of sunlight, and we know that seeds can’t grow without their source of energy: light photons! Take access to a power outlet into consideration if you need to elevate the plants. I decided to supplement my seeds with a simple desk lamp equipped with a CFL bulb and am having some great results! Another option I am using is clear storage containers.
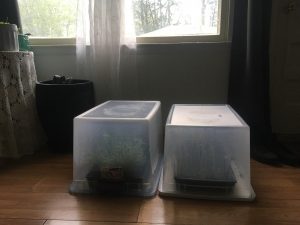
This one I’m pretty excited about, as it is like having a mini greenhouse inside my own home. I had some clear plastic storage containers going unused and so, I flipped them upside down, using the clear box as a dome I placed the seedlings on the lid on the floor, these seedlings sit in my front window and are completely protected from my curious cat while also creating a warm microclimate and holding in moisture for a longer period of time. This method is also working very well for me and both have resulted in sprouts so far.
The goal here is to be creative and use a solution that is right for you. A saying I have heard that fits very well into this time of confusion is “Do what you can, with what you’ve got, where you’re at.” These are strange times, but through creative and open minds we are sure to find solutions without requiring fancy techniques.

In about a month when it is time to harden off and transplant your seedlings, you will again not need any special tools! Start by slowly introducing your starts to the outside world, avoid windy days, and remember to bring them inside overnight. After a week or two of hardening off, aim to officially transplant into your garden after our regional May 15th last frost date. By using a butter knife or simple spoon, you can loosen the soil from your homemade container. Gently maneuver your kitchen utensils around the rim of the pot and scoop up from the very bottom. If you have trouble getting the plantlet out, place the stem gently between your pointer and middle finger and turn the pot upside down, the plantlet will fall out with the soil into the palm of your hand, from here place the transplant into your pre-dug hole, making sure to bury all of the roots. When you are done transplanting you can water them all in and prepare for the next steps on your Victory Garden adventure. Continued care and cultivation.
Ciera Wilbur, Forest Farming AmeriCorps VISTA
Appalachian Sustainable Development